Camera Parts and Functions Explained
Let’s be honest. Most people buy a camera, work out how to turn it on, and ignore everything else. All those buttons, dials and little rubber flaps remain a mystery. But that’s like buying a car and only ever using first gear. This guide will walk through every important part of your camera and explain what it actually does for your photography.
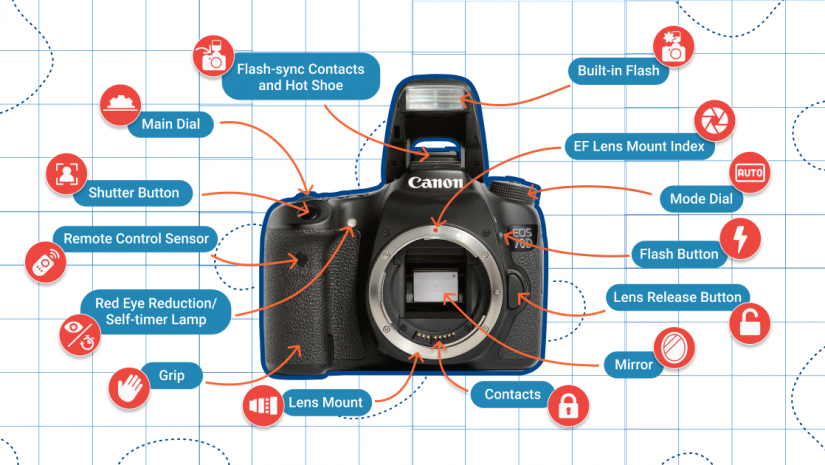
The Body
The body is the camera itself, the housing that holds all the clever bits inside. Think of it as the chassis of a car.
Inside that body is the sensor (which captures the image), the processor (the brain), the battery (the power) and all the electronics that tie everything together. The size and shape matter more than you might think. Professional bodies are larger, with more buttons placed within easy reach of your fingers. This means you can change settings quickly without taking your eye away from the viewfinder. Entry-level bodies are smaller and lighter, which is great for carrying around, but you might find yourself hunting through menus more often.
Here is the thing: A body that feels comfortable in your hands will get used far more than one that digs into your palm or feels unbalanced with a heavy lens. Always hold a camera before buying if you possibly can. The best specifications in the world mean nothing if you cannot stand holding the thing.
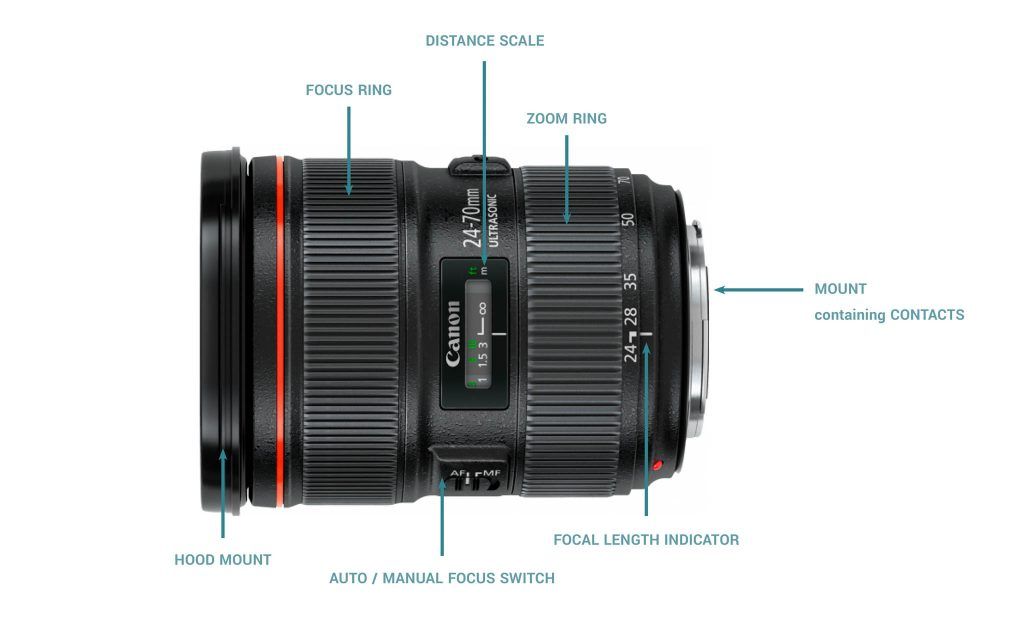
The Lens
This is the eye of your camera. The lens focuses light onto the sensor, and its design completely changes what your photograph looks like.
A wide-angle lens fits loads into the frame, making it perfect for landscapes or tight indoor spaces. A telephoto lens brings distant subjects closer, ideal for wildlife or sports. A prime lens has a fixed focal length, but you zoom with your feet, this often gives better quality and works better in low light. A zoom lens gives you flexibility, letting you frame shots without moving.
Key parts of a lens you should know:
- Focus ring – The ridged ring you turn to focus manually. Even if you use autofocus, learning to focus manually is an important skill.
- Zoom ring – On zoom lenses, this changes the focal length. Turn it to make your subject bigger or smaller in the frame.
- Aperture blades – Inside the lens, these open and close to control light. They also create that lovely background blur everyone wants.
- Lens mount – The metal ring that attaches to your camera body. Different brands use different mounts, which is why you cannot just attach any lens to any camera.
Remember this: The lens is often more important than the camera body. A good lens on a basic body will give you better results than a cheap lens on an expensive body. If you are going to invest money, invest it in glass.
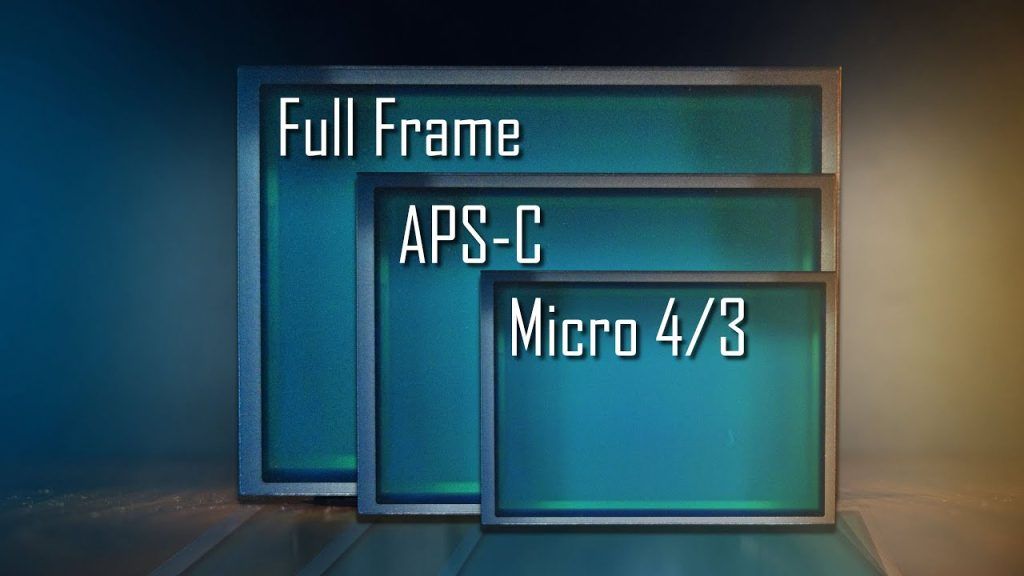
The Sensor
If the lens is the eye, the sensor is the retina. This electronic chip captures light and turns it into the digital image file you see on your screen.
When you press the shutter button, the sensor is exposed to light for a fraction of a second. Each pixel on the sensor records how much light hit it and what colour that light was. The processor then takes all this information and builds it into a photograph.
Sensor sizes can be confusing, so let us keep it simple:
- Full-frame – The same size as 35mm film. Best image quality, especially in low light, but expensive and the cameras are large.
- APS-C – Smaller than full-frame, found in most consumer cameras. Excellent quality for the price, a sensible middle ground.
- Micro Four Thirds – Smaller still, used by Panasonic and Olympus. Very compact system, quality is good but harder to get shallow depth of field.
- Compact camera sensors – Much smaller, but still far better than smartphones.
What this means for you: Bigger sensors generally give better quality and let you blur backgrounds more easily. But they also mean bigger, more expensive cameras and lenses. For most people starting out, APS-C is the sweet spot.
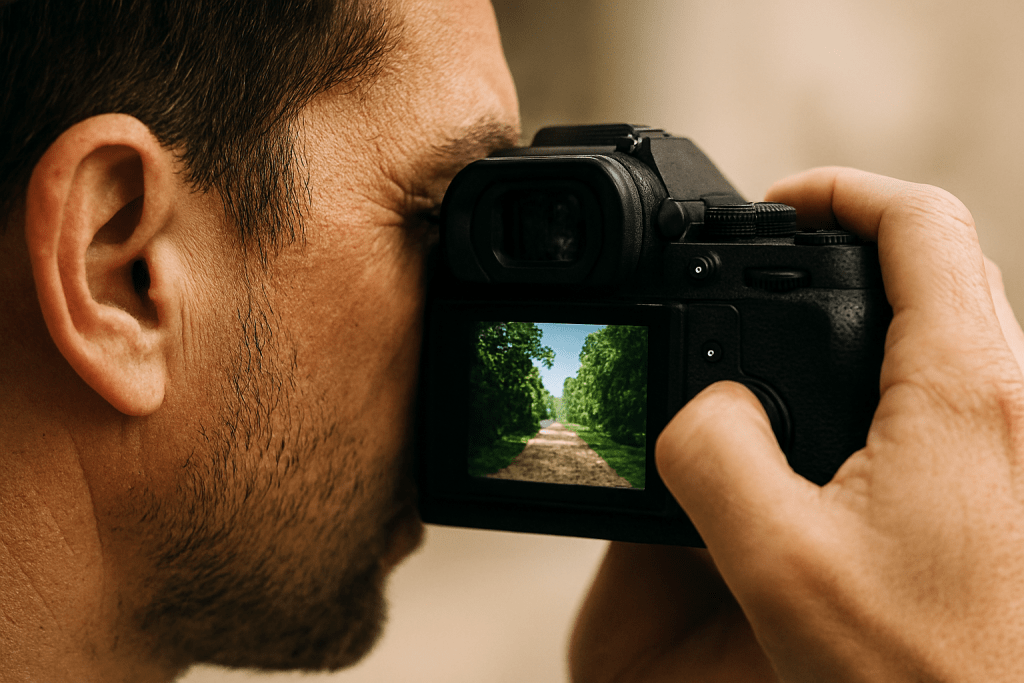
The Viewfinder
This is what you look through to compose your photograph. There are two main types, and they give very different experiences.
Optical viewfinders are found in DSLRs. They use a mirror to show you the actual scene, directly through the lens. What you see is what is really there – clear, immediate, with no flicker or delay, but you cannot see the final exposure. You might think your photo is perfectly exposed, only to find it is too dark or too bright.
Electronic viewfinders are in mirrorless cameras. They show you a tiny screen inside the viewfinder. This means you see exactly what your final photo will look like – the exposure, the depth of field, even the colour balance. The downside is they can feel less immediate, and they drain battery faster.
The LCD screen on the back is technically another viewfinder. It is brilliant for shooting from odd angles or reviewing your shots, but it is less stable than holding the camera to your eye.
Which is better? It comes down to personal preference. I know photographers who switched to mirrorless and never looked back. Others miss the clarity of an optical viewfinder. Try both if you can.
The Shutter Button
This is the button you press to take a photograph. It sounds simple, but most people use it wrong.
The shutter button has two stages. A half-press activates autofocus and locks your exposure. A full press takes the picture. That half-press is crucial – it gives the camera time to focus properly and lets you lock focus on your subject before recomposing your shot.
Here is a technique to practice: Frame your shot. Half-press the button and hold it. Your focus locks. Now, keeping the button half-pressed, recompose slightly if needed. Then press fully to take the shot. This gives you far more control over where your focus point lands.
Press gently. A jabbing finger moves the camera and creates blurry images. A gentle squeeze keeps things sharp.
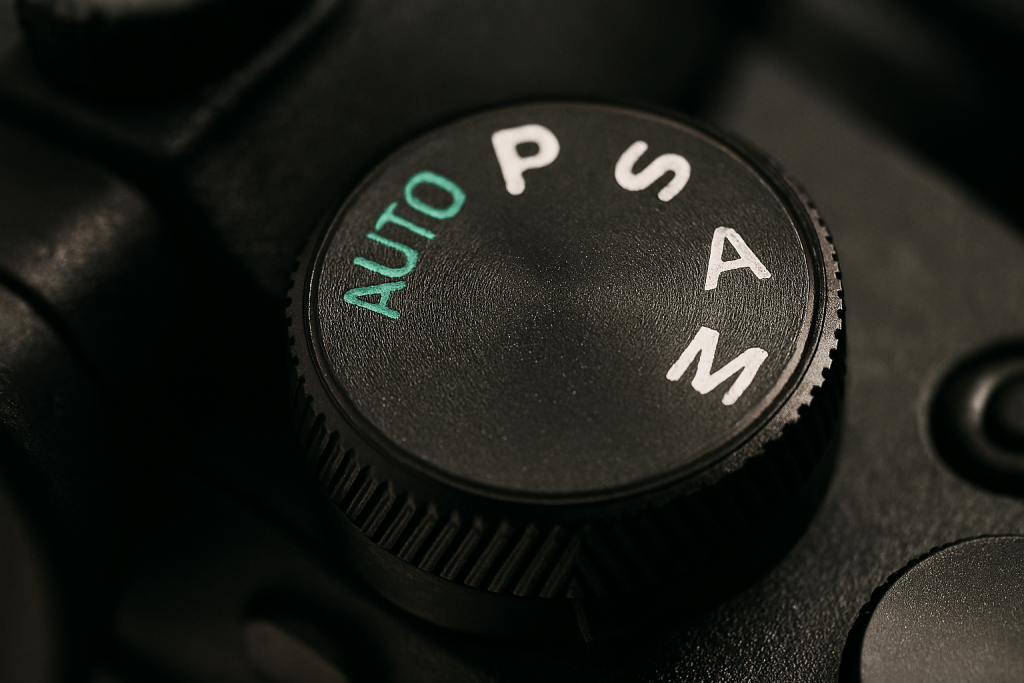
The Mode Dial
This is the dial on top of your camera with letters that confuse everyone at first: AUTO, P, S, A, M, and little picture icons for portrait, landscape, sports and so on.
What these modes actually mean:
- AUTO – The camera makes every decision. You are just pointing and pressing.
- P (Program) – The camera chooses aperture and shutter speed, but you control ISO, white balance and other settings. A good stepping stone.
- S or Tv (Shutter Priority) – You set the shutter speed, the camera sets the aperture. Use this for freezing or blurring motion.
- A or Av (Aperture Priority) – You set the aperture, the camera sets the shutter speed. This is the mode most photographers use most often. It controls depth of field.
- M (Manual) – You control everything. Essential for studio work and tripod shooting, but overkill for everyday photography.
- Scene modes – Portrait mode favours wide apertures for blurred backgrounds. Landscape mode uses small apertures for maximum sharpness. Sports mode uses fast shutter speeds. They are shortcuts, not cheats.
My advice for beginners: Start with aperture priority. It gives you creative control over how your photos look while the camera handles the technical side of getting a correct exposure. Once you understand what changing the aperture does to your images, the rest starts to make sense.
Command Dials
These are the wheels on your camera body, usually one near your thumb and another near your forefinger. They are your main controls for changing settings quickly.
In aperture priority mode, one of these dials controls your aperture. In shutter priority, it controls shutter speed. In manual mode, one dial usually controls aperture while the other controls shutter speed.
The key skill to practice: Learn to use these dials without looking at them. Feel for the clicks. Count them if you need to. Being able to change settings while keeping your eye to the viewfinder is what separates people who own cameras from photographers. It becomes muscle memory, and muscle memory is fast.
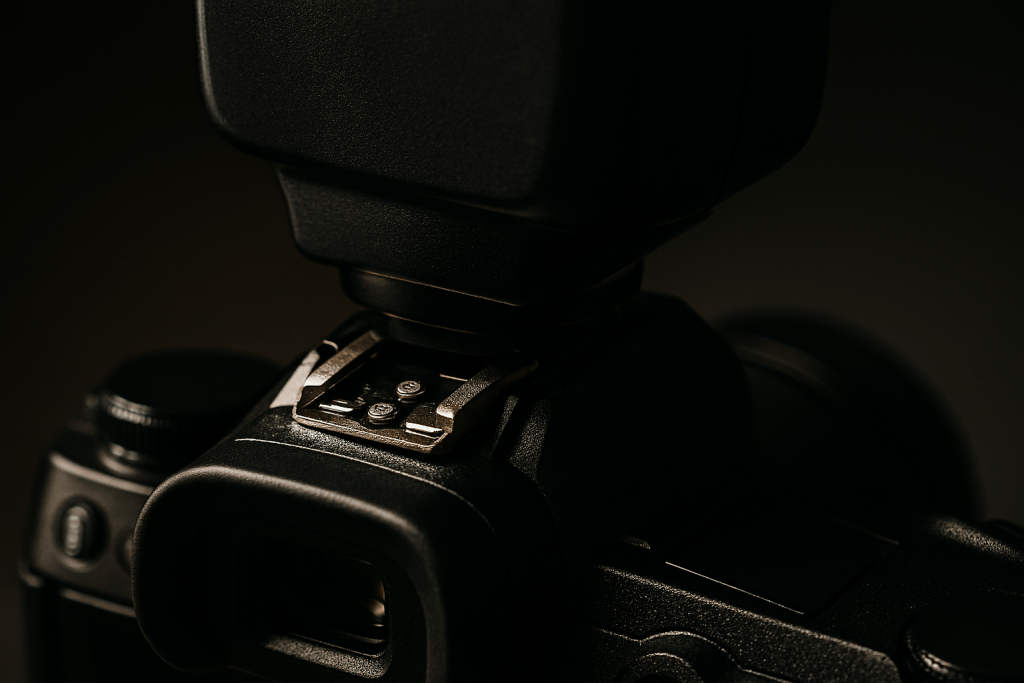
The Hot Shoe
That metal bracket on top of your camera is called the hot shoe. You probably have not touched it, but it is one of the most useful features on your camera.
The hot shoe lets you attach accessories: external flash guns, LED panels for video, better microphones, even electronic viewfinders on some compact cameras. It transfers information between the camera and the device, so the camera can control when the flash fires and how bright it is.
Here is why this matters: The built-in flash on most cameras is harsh and creates horrible shadows and red eyes. A proper flash on the hot shoe, bounced off a ceiling or wall, creates soft, natural-looking light. Learning to use one flash properly will transform your indoor photography more than any new lens or camera body.
Memory Card Slot
This is where you insert your memory card. It is usually behind a little door on the side of the camera.
Different cameras use different types of cards. Most use SD cards. Some professional cameras use CFexpress or XQD cards, which are faster but more expensive. The speed rating matters – a slow card can make a fast camera feel sluggish because the camera has to wait for the card to save each photo before it can take the next one.
A practical tip: Buy the fastest card you can afford, and always carry a spare. There is nothing worse than running out of space at the wrong moment. A 64GB card costs less than a takeaway and can save a shoot.
Battery Compartment
Usually in the grip of the camera, this is where the battery lives. It is a simple thing, but understanding battery life is crucial.
DSLRs can shoot thousands of photos on one charge because they are not powering a screen all the time. Mirrorless cameras typically manage a few hundred shots. Cold weather drains batteries faster. Shooting video uses more power than stills.
What this means for you: Always charge before a shoot. Always carry a spare. And know your real battery life, not the manufacturer’s optimistic claims. Test it properly so you are never caught out.
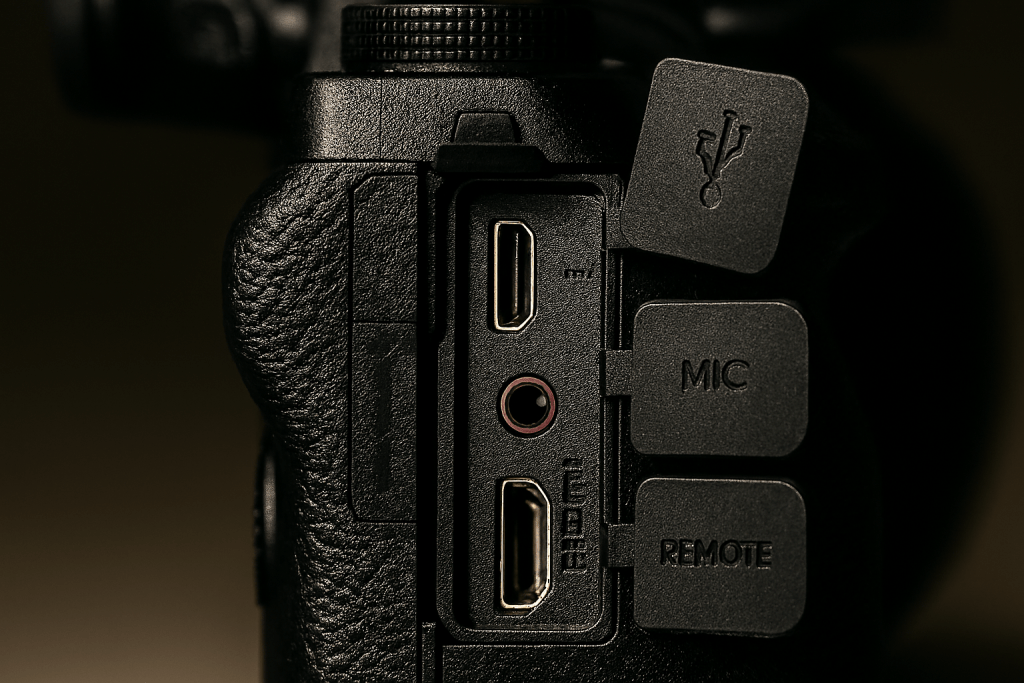
Ports and Connections
On the side of your camera, behind little rubber doors, you will find various ports. Most people never touch them, but they are useful.
The USB port lets you transfer images without removing the card, and on newer cameras, it charges the battery. The HDMI port connects to a TV to show your photos properly. The microphone input is crucial for video – the built-in microphones are never good enough. The headphone jack lets you monitor sound while recording. And the remote release port lets you trigger the camera without touching it, perfect for long exposures or self-portraits.
Take five minutes today: Open those little doors and see what ports your camera has. Then look up what each one does. One of them might solve a problem you did not even know you had.
From Knowing to Using
Reading about camera parts is one thing. Using them without thinking is another. This week, pick one part of your camera each day and focus on using it properly. By Sunday, you will be operating your camera with much more confidence.
The best camera is the one whose controls disappear, letting you concentrate on the photograph you are making.
Which part of your camera confuses you most? Tell me in the comments on the Facebook or X.com page, and I’ll try and help.